Carrot Cake with Cinnamon Cream Cheese Frosting

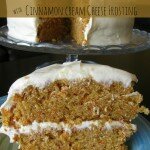
I know I’m a little late with the Carrot Cake recipe, seeing that most people associate it with Easter.  I did make it near Easter this year but it was for another special day.  It was my Dad’s birthday!   His birthday fell on the Saturday of the Easter weekend so I couldn’t post it before then.   I wanted a simple, moist carrot cake recipe and I knew I wanted to add some cinnamon to the basic cream cheese frosting.

Carrot Cake with Cinnamon Cream Cheese Icing1

Although this cake turned out great, I can’t say that about the first recipe I tried.  That one ended up in the compost bin!  It was way too oily and it tasted like baking soda – yuck!
This recipe still used oil, which you need for moisture, but it was the perfect amount.   I knew that it would probably turn out since most recipes from this website are “Tested ’till Perfect”, although this recipe was a reader’s recipe.

Carrot Cake with Cinnamon Cream Cheese Icing

I didn’t really ask my dad what his favorite cake was, but it was Easter and I was craving a Carrot Cake with Cinnamon Cream Cheese Frosting, so that’s what he got!   It was mostly for him and little bit for me.  If I’m baking it I get to have a little bit of a say, don’t I?!
*The picture below is what my kitchen looked like after I made this cake.  My husband always laughs at me and says I should have called my blog “The Messy Baker”!  Sorry honey, there’s already a blog by that name.  Besides, I always clean up after myself and he always gets the sweet treats to eat!

Messy Kitchen

Carrot Cake with Cinnamon Cream Cheese Frosting

Prep Time: 20 minutes

Cook Time: 35 minutes

Total Time: 55 minutes

Yield: 10-12 servings

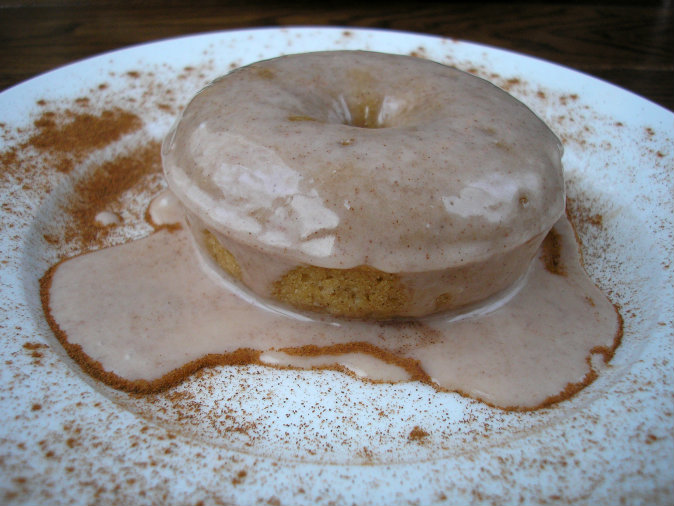
A classic, moist and delicious carrot cake smothered in a cinnamon-infused cream cheese frosting.

Ingredients

  • For the Cake:
  • 4 eggs, beaten
  • 2 cups all-purpose flour
  • 2 cups sugar
  • 2 tsp baking powder
  • 1 tsp ground cinnamon
  • 1/2 tsp baking soda
  • 3 cups finely shredded carrots, lightly packed
  • 3/4 cups vegetabIe oil
  • For the Frosting:
  • 1 pkg. cream cheese, room temperature
  • 1/2 cup butter, room temperature
  • 1 tsp. vanilla
  • 1/4 tsp. cinnamon
  • 3-4 cups icing sugar (depending on what consistency and sweetness you want your icing)

Instructions

For the Cake:
Preheat oven to 350 F. Grease and flour two 9x1/2-inch round cake pans; set aside.
In a large mixing bowl combine flour, sugar, baking powder, cinnamon, and baking soda.
In another mixing bowl whisk eggs and then add carrots, and oil. Add egg mixture to flour mixture. With a spoon, stir until combined. Pour batter into the prepared pans.
Bake for 30 to 35 minutes or until a toothpick inserted near the center comes out clean.
Cool for about 10 minutes in pans; then remove from pans to cool more thoroughly.
For the Frosting:
In a stand mixer with the paddle attachment, cream together cream cheese, butter, vanilla and cinnamon. Slowly add icing sugar until you reach the desired consistency and sweetness you want.
Spread icing on one cake and place the other cake on top. Use remaining icing to cover the entire cake.
Enjoy!
Cake recipe from Canadian Living
Schema/Recipe SEO Data Markup by
https://asweetbaker.com/carrot-cake-with-cinnamon-cream-cheese-frosting/

White Chocolate Biscoff Cookie Bars

Since I bought a couple of jars of Biscoff when I was in the US, I thought I better make something with it instead of eating it straight out of the jar!  I knew I wanted to incorporate white chocolate because I thought it would go perfect with Biscoff.  So, I made these White Chocolate Biscoff Cookie Bars, which I ate straight out of the pan……instead of the jar!

White Chocolate Biscoff Cookie Bars

When I first took them out of the oven they were still a little gooey in the middle.  I ended up putting them back in for another 10 minutes and they were perfect.  I couldn’t resist eating all the crunchy edges while they were still warm.  I really had to force myself to walk away from the pan, otherwise I could have ate the whole thing.  Seriously!

White Chocolate Biscoff Cookie Bars

I’m not sure my kids liked them as much as I did because I noticed that there’s still two pieces left.  Perfect – more for me!  Once those two pieces are gone, I guess I’m going to have to go back to eating Biscoff straight out of the jar!  Oh, darn!  There could be worse things! :)

White Chocolate Biscoff Cookie Bars1

White Chocolate Biscoff Cookie Bars

Prep Time: 10 minutes

Cook Time: 35 minutes

Total Time: 45 minutes

Yield: 12 bars

Chewy cookies bars filled with creamy Biscoff and White Chocolate Chips.

Ingredients

  • 1/2 cup unsalted butter, melted and then cooled slightly
  • 1 egg
  • 3/4 cup brown sugar, packed
  • 1/4 cup sugar
  • 1 Tbsp. vanilla
  • Heaping 1/2 cup of Biscoff
  • 1/2 tsp. cinnamon
  • 1 1/4 cups flour
  • 1/2 tsp. baking soda
  • pinch of salt (optional)
  • 1 pkg. (save 1/4 cup for the top) White Chocolate Chips

Instructions

Preheat oven to 350 F.
Line an 8X8 pan with foil, spray with cooking spray and set aside.
In a medium size bowl, mix together flour, baking soda and optional salt. Set aside.
In a stand mixer with the paddle attachment, blend cooled butter with egg, then add sugars and vanilla and mix until smooth and creamy.
Add in the Biscoff and cinnamon and blend well.
Slowly add the dry ingredients and stir until just incorporated.
Stir in White Chocolate Chips.
Pour batter into prepared pan and smooth with a spatula or the back of a spoon.
Once batter is smooth, pour the reserved 1/4 cup of White Chocolate Chips on top.
Bake for 30-35 minutes or until toothpick inserted into center comes out clean (or almost clean, since you may hit chocolate).
Enjoy!
Recipe adapted from Averie Cooks
Schema/Recipe SEO Data Markup by
https://asweetbaker.com/white-chocolate-biscoff-cookie-bars/

Sour Cream Coffee Cake with Maple Syrup Glaze

Happy Friday!
This recipe was originally posted on “What’s Cooking with Ruthie” as I’m a monthly contributor for her.  Ruthie has been so awesome to work with and I love checking out her great recipes and video tutorials on her site.   This Sour Cream Coffee Cake with Maple Syrup Glaze was so delicious that I had to share it on A Sweet Baker too!Sour Cream Coffee Cake
I’ve mentioned before on my blog that I’m not a very big fan of cake.  Yes, you heard me, I can take it or leave it.  I prefer dense, moist desserts like my brownies, bars, or loaves.  Coffee cake has been an exception, though.  It’s moist, dense, and full of flavor.   That’s what you get that when you taste this Sour Cream Coffee Cake.   A cake that’s ribboned with cinnamon-sugar streusel, topped with more streusel, and then drenched in a Maple Syrup glaze that goes perfect with it.

Sour Cream Coffee Cake

Coffee Cake has always been a dessert that brings back memories of my childhood.  I first tasted a Sour Cream Coffee Cake when my brother and I went on a camping trip with my aunt and uncle.   We stopped at a local farmer’s marker that was run by Mennonites, in a small community south of where we lived.   My aunt bought one of their Sour Cream Coffee Cakes and we shared it once we got back home.  I remember it being one of the moistest, most delicious cakes that I had tried.  It had all that crunchy, sugary struesel on top, which gave it more of an appeal to me.  Since then I have been searching for a recipe that tastes just like the one I remember as a kid.

Sour Cream Coffee Cake

This cake came out moist, dense, and flavorful.  Just the way I like it!  The only thing I would change next time is I would double the struesel recipe and add more if it inside……because you can never get enough struesel!

Sour Cream Coffee Cake

Prep Time: 15 minutes

Cook Time: 50 minutes

Total Time: 1 hour, 5 minutes

Yield: 8-10 servings

A moist, dense, coffee cake that is ribboned with cinnamon-sugar streusel and topped with a Maple Syrup glaze.

Ingredients

  • For the Cake:
  • 12 tablespoons (1 1/2 sticks) unsalted butter at room temperature
  • 1 1/2 cups granulated sugar
  • 3 extra-large eggs at room temperature
  • 1 1/2 teaspoons pure vanilla extract
  • 1 1/4 cups sour cream
  • 2 1/2 cups cake flour (not self-rising)
  • 2 teaspoons baking powder
  • 1/2 teaspoon baking soda
  • 1/2 teaspoon kosher salt
  • For the Streusel:
  • 1/4 cup light brown sugar, packed
  • 1/2 cup all-purpose flour
  • 1 1/2 teaspoons ground cinnamon
  • 1/4 teaspoon kosher salt
  • 3 tablespoons cold unsalted butter, cut into pieces
  • For the Glaze:
  • 1/2 cup icing (confectioners') sugar
  • 2 Tbsp. Maple Syrup

Instructions

Preheat oven to 350 F. Grease and flour a 10-inch tube pan or bundt pan.
Cream butter and sugar in the bowl of a stand mixer fitted with the paddle attachment for 4 to 5 minutes, until light and creamy.
Add the eggs 1 at a time.
Add the vanilla and sour cream.
In a separate bowl, sift together the flour, baking powder, baking soda, and salt. With the mixer on low, add the flour mixture to the batter until just combined.
Finish stirring with a spatula to be sure the batter is completely mixed.
For the streusel, place the brown sugar, flour, cinnamon, salt, and butter in a bowl and pinch together with your fingers until it forms a crumble.
Spoon half the batter into the pan and spread it out with the back of a spoon. Sprinkle with 3/4 cup streusel. Spoon the rest of the batter in the pan, spread it out, and scatter the remaining streusel on top. Bake for 50 to 60 minutes, until a cake tester comes out clean.
Let cool on a wire rack for at least 30 minutes. Carefully transfer the cake, streusel side up, onto a serving plate. Whisk the icing sugar and maple syrup together, adding a few drops of water if necessary to make the glaze runny. Drizzle over cake.
Enjoy!
Recipe slightly adapted from Ina Garten's recipe on the Food Network
Schema/Recipe SEO Data Markup by
https://asweetbaker.com/sour-cream-coffee-cake-with-maple-syrup-glaze/

Red Velvet Cinnamon Buns

Red Velvet Cinnamon Buns.jpg

With Valentine’s Day just around the corner I wanted make something that I’ve never made before.   I’ve seen so many recipes that include Red Velvet cake that I wanted to see what all the fuss was about.  Can you believe that I’ve never tried it before?  Yup, you heard it right.  Never!  I don’t know why I haven’t, it’s just been something that’s never interested me.

But, seeing that Valentine’s Day involves so much red stuff, I went for the Red Velvet…..with cinnamon, of course!

Red Velvet Cinnamon Buns2

I don’t know about you, but Valentine’s Day isn’t a big deal for me.  Sure, I like it when my husband does something sweet or romantic for me, but I don’t get upset if he forgets.  To me, Valentine’s Day should be any day throughout the year when I get to be alone with my hubby and we can forget about packing lunches, driving kids to gymnastics practice, or breaking up fights about who got more dessert!     If those dates happen to involve Red Velvet Cinnamon Buns, well even better!

Red Velvet Cinnamon Buns3

Red Velvet Cinnamon Buns

Ingredients

  • FOR THE DOUGH:
  • 1 box of Red Velvet cake mix
  • 2 packages yeast
  • 2 & 1/2 cups of warm water
  • 1 tsp. salt
  • 1 tsp. vanilla
  • 5 cups of flour
  • FOR THE FILLING:
  • 2 sticks of butter, softened
  • 1 cup brown sugar
  • 1 cup white sugar
  • 1 Tbsp. cinnamon
  • FOR THE FROSTING:
  • 1 package of cream cheese, softened
  • 1 stick of butter, softened
  • 1 & 1/2 cups icing sugar
  • 1 tsp. vanilla
  • pinch of salt

Instructions

In your stand mixing bowl, combine the yeast and warm water. Stir until dissolved. Add the cake mix, flour, salt and vanilla. Using your dough hook, knead until all ingredients are combined. Move dough to a large, lightly greased bowl and cover. Let sit for about 1 hour. Once dough has almost doubled in size, punch down.
On a clean, floured surface, turn out dough. Shape into a ball, using flour when needed. Roll dough into a rectangle about 10X20 inches. Spread softened butter all over the dough. Mix brown sugar, white sugar, and cinnamon in a small bowl and sprinkle evenly over the buttered dough. Using a sharp knife, start cutting the dough into 1 inch strips from the top (so your strips are 10 inches long). To make the heart shapes, take each end and roll towards the middle. Pick up your strip of rolled-up dough and place on a cookie sheet. Use your fingers to shape into a heart, squeezing the bottom together to form the point. I had a whole left in the center so I filled it with the sugar mixture that fell out on the counter. Place each heart about 2-3 inches apart so they don't touch when baked.
Bake at 350 F for 15 minutes.
While the hearts are baking you can go ahead and make your frosting. In a stand mixer, using your paddle attachment, mix together cream cheese, butter, icing sugar, vanilla and salt. Mix until icing is creamy and smooth.
You can enjoy your frosting on warm buns or pipe on hearts once the buns have cooled.
Enjoy!
Schema/Recipe SEO Data Markup by
https://asweetbaker.com/red-velvet-cinnamon-buns/

Recipe slightly adapted from No. 2 Pencil

Cinnamon Roll Donuts

Cinnamon Roll Donuts

Happy New Year!

I’m finally back after having two weeks off from my full-time job and from my blog.   It was a busy two weeks that I don’t know how I would have fit in blogging anyway.  I did try to keep up with following everyone else’s blog through Bloglovin’ so that kept me in the loop somewhat!

I tried so many great desserts over the holidays but now I’m back my regular routine and hoping these few extra pounds that found my waistline will take a hike real soon!  It was so worth it though!

OLYMPUS DIGITAL CAMERA

To make ourselves feel better about going back to school/work, my son and I decided to do some baking.  I wanted to try out my new I got for Christmas and I wanted something with cinnamon in it.  That’s when I found this recipe for Cinnamon Roll Donuts.  Can you ever go wrong with donuts….or cinnamon?!  I don’t think so!

These donuts smelled so good while they were baking and the recipe made the perfect amount (which was perfect because I still have so much Christmas baking in my freezer).  My boys couldn’t wait to try them and even ate them without the added frosting.  I think they knew they would probably get another one with the frosting later!  Good thinkin’, boys!

Cinnamon Bun Donuts


Cinnamon Roll Donuts

Prep time:
Cook time:
Total time:
Serves: 6
Moist, baked donuts that are full of cinnamon-goodness!
Ingredients
  • For the donuts:
  • 1 cup all-purpose flour
  • 4 tbsp. white sugar
  • 3 tbsp. brown sugar
  • 1 tsp. baking powder
  • 3/4 tsp. cinnamon
  • 1/8 tsp salt, optional
  • 6 tbsp buttermilk (I didn’t have any buttermilk on hand so I used 5 1/2 tbsp. of milk and 1/2 tsp. vinegar and let sit for 5 minutes)
  • 1 egg
  • 1/2 tsp. vanilla extract
  • 1 tbsp butter, melted
  • For the frosting:
  • 1/2 cup icing sugar
  • 1/8 tsp. cinnamon
  • 1/2 – 3/4 tbsp. milk
Instructions
  1. Preheat oven to 325 F.
  2. In a mixer put in all dry ingredients and mix until combined.
  3. Add buttermilk (or milk/vinegar mixture), egg, vanilla, and butter and mix until batter-like consistency.
  4. Using a piping bag or Ziplock bag with a whole cut in the corner, pipe batter into donut pan. I just poured from the bowl with my spatula and that worked too!
  5. Bake for 10-13 minutes or until donuts spring back when touched.
  6. Let cool in the pan for 5-10 minutes and transfer to an airtight container until you’re ready to frost.
  7. For the frosting, whisk together icing sugar, cinnamon, and milk in a small bowl and pour over donuts.
  8. Enjoy!

Recipe adapted from Averie Cooks

< <